Come use the Brother Scan N Cut with me!
I have not blogged in a while. I have been crafting and maybe just having too much crafting fun and not documenting it as much as I should.
Okay, To start off......I know I am crazy! I have quite a few cutting machines. I have the Silhouette Portrait 3 and 4, Cameo 4 and 5 on the way, and Curio, the Cricut Maker, (just got rid of the Joy), and now I am the proud owner of a Brother Scan N Cut SDX85 which is known for its scanning abilities.
I decided to try a few projects today. There will be so much more to come but wanted to get this blog out!
I want to start out by saying that I love the PixScan mat feature with my Silhouette Cameo and Portrait but......Wow, the Scan N Cut just sucks up the mat, scans the mat, produces a cut file, and cuts it out for you all within the machine. BTW it knows the thickness of your paper amd sets the blade itself. If you are a person that doesn't LOVE technology and has a hard time with computers, this machine is your friend! Everything I did today was right on the machine and it worked so nicely.
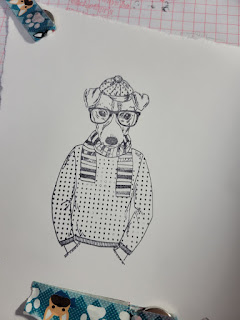
First, I stamped an image with my MISTI on to a pc of cardstock. Prob 110 pound cardstock.
Then, I stuck the cardstock with my stamped image to the Brother Scan N Cut scanning and cut mat.

Then, I loaded the mat and pressed scan on the machines monitor. The machine scanned the image and put it on the monitor. I can crop and offset the image on the monitor. (Offset is to add a tiny bit of space around my image) I like to do this so that there is a little white space. You can cut directly on the outside of the image too if that is what you want.
I decided to crop the image to just my stamped image so that the machine wouldn't find a random thing to cut that really isn't there.
I then pressed cut and it cut out so perfectly! This mat was super sticky though so press the mat on your tshirt so that it gets less sticky. The paper stuck really well and I almost ripped my paper. This model has an autoblade which means it knows how thick the paper is to cut through it. I didn't even have to tell the machine what type of paper or weight I had loaded. Talk about easy peasy lemon squeezy!
Next, I decided to load a piece of scrapbook paper to cut out all the roses on it.

I loaded the matt to scan, I didn't really pay much attn to the image that popped up but I should have. It shows you exactly what is going to cut. I could have done a very small offset. Honestly though it cut so many flowers out with pretty good precision. I didn't have to create a cut file or trace the image to make a file like I do on my Cameo 4. I just let the machine scan the paper and cut. Look at these beautiful flowers!


It took about 20 min to cut that entire page of flowers. With my Cameo it would have taken a lot more time to build the cut file out and I may not have gotten such precise cuts. Not on an entire page of flowers like that. I would have also had to figure out how thick that paper was and set the settings to cut through it. It take some time to set up on the Cameo. If I were using Cricut I really don't have this option at all. Also the machine is just super quiet. I didn't realize how noisy the other machines are.
I also will say the price point of this machine is much more than I would start with. The price point seems to be around 399.99 and then if you want certain images like Mickey images, you have to pay for cards and download the images. It comes with a few fonts and if you download the desktop version of the software you can upload more fonts. I use www.dafont.com as they are all free.
Scan N Cut offers a computer program, app, and desktop software called canvas workspace.
I also played around with cutting some vinyl. Again, a huge benefit to this machine is that it recognizes your paper or vinyl and adjusts the cut so that it cuts beautifully.
I designed the vinyl cut on the web based version of canvas workspace, sent it wirelessly to the machine, saved it on the machine, and then cut it out and used "half cut" which means kiss cut for the vinyl sticker and it cut perfectly again! No fuss and no issues cutting.
So far, this machine is going beyond my expectations.
I print and cut stickers all the time on my Cameo and it is a great sofware. The Cricut also will cut stickers but its not as good in my opinion as the software isn't that great.
I printed out a sheet of stickers on an 8.5x11 pc of sticker label paper to scan and run through my scan n cut.
I scanned the sticker sheet and I did notice that one of the stickers will cut inside of it even after an offset is placed but I am going to let it do its thing and see how it turns out. Not having to trace and create my own cut lines is a huge advantage so I can always set up a file to have an offset before I print it in the future.

My stickers cut great with the exception of the one that had cut lines inside of it. Easy fix though!
Next, I had to make a scrapbook page for my husband. He's a teacher and the school asked that it be done. I used my new Scan N Cut to cut his name and the other embellishments on the page. Again, perfect cuts and no settings! I used 3 different weights of paper too and no issues!!!!! I am afraid this machine may become my favorite. I will say, the software isn't as great as Silhouette software though. I think they just have a superior software. The great thing is that you can still use the Silhouette software and design there, then open up a .svg with the Canvas software and send it to your machine as well.

I was able to test paper, vinyl, sticker paper, scanning, desktop version, web version, and app.
All in all I am so happy I bought this machine. I plan on using it often.
If you have any questions, please leave me a comment and please do not forget to follow me!
💓ImGinBugCrafter
www.instagram.com/imginbugcrafter
www.imginbugcrafter.com
Comments
Post a Comment