Come sublimate a 30 ounce tumbler with me

Let's Make a 30 Ounce Tumbler!

I bought some 30 ounce tumblers off amazon and decided I needed to sub them.  
I have an 8.5x11 printer so I knew I would either have to tape the paper together or just have an image that took up most of the cup.  I decided for my very first tumbler I would just use an image that was smaller than the entire cup.

Items you need:

  • Sublimation printer
  • Cricut mug press
  • Sublimation treated tumbler 30 ounce
  • Sublimation paper
  • Parchment paper
  • Heat resistant tape
  • Heat resistant gloves

First design and print your image.  I use silhouette studio but you can print it with whatever you have on sublimation paper with your sublimation printer.

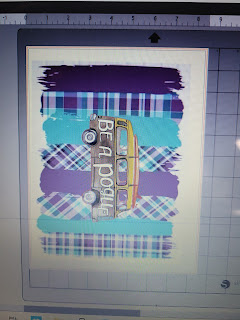
This is the image I decided to print.


Once you have printed it, cut as close as you can to the image.

Wrap it around your cup and use your heat resistant tape to put it on your cup as tight as you can.  Do not try and save tape, the more tape the better image you will get.


Next turn your Cricut mug press on until it beeps.
Put the cup wrapped in parchment paper into the mug press and shut it.
Wait 1 minute then turn your cup so that you can get all sides heated up.
Wait 1 more minute then flip your cup.  Be sure to elevate the top of your cup just a little to prevent ghosting.

Ghosting is when you see white marks on your cup.  I did end up with a little but for my very first cup ever, I am so happy with it.


Pull your cup out with your heat resistant gloves and take tweezers and peel the tape off revealing your new cup image.


I love how it turned out. Its vibrant and has good color.  I had a little ghosting at the seam so I think next time I will use way more tape.  That should fix the ghosting issue.

Do you make cups?
If you do, how do you make them?  Leave tips in the comments!

Thanks for reading!

💓ImGinBugCrafter

www.imginbugcrafter.com
www.instagram.com/imginbugcrafter

Comments

Popular posts from this blog

Come and make your own sublimation spray with me!

  Come make some sublimation spray with me! You are asking yourself what is sublimation spray and what is it used for? Well, as you may or may not know, you have to sublimate on polyester.  The higher the % of polyester the higher chance your image will stay on the item you are subbing on. Well, I found a way to make some spray that you can spray on cotton or any other fabric and it will sublimate.   For instance, I tried sublimating on this random patch I have.  I don't know what it is made of so i wanted to see if it would work.  It didn't.   Random Patch with no sub spray: Then I made the sublimation spray. Items you need: Polycrylic protective finish, I used clear satin but you can use clear matte as well. Spray Bottle Water Then your usual sublimation products: Sub paper Sub printer Heat press Fabric to sublimate on To make the spray, use 8 ounces of water and 2 tablespoons of Polycrylic.  Mix them together into a jar (I used a maso...

Simon Hurley Create Stamping Foam by Ranger (The best thing I've seen in a long time)

Stamping Foam!  Craft With Me! You can heat this puppy up and press anything into it to make a stamp.   This is the first time I have used this item and it was super simple to use.  I got the hang of it really fast and I will be using it a ton.  I was really impressed that I got such good impressions the very first time I used it.  You could also use this with an acrylic block I just didn't see a need. Items needed: Simon Hurley Create.  By Ranger Stamping Foam 3" x 4.25" block Water bottle-I used one from the Dollar Tree Heat gun-I used the Embossing Heat Tool by Marvy Cardstock-I actually used the back of a paper pad to practice Instructions: Heat your stamping foam up for around 15 seconds with your heat gun Stamp your foam onto your favorite texture Make sure to push your foam into the item pretty good Ink up your Foam!  Rub ink in a circular motion onto the stamping foam Spray the stamping foam with water (3 sprays fine mist will do) Stamp yo...

Foil With Me!

Come Craft With Me! I'm not sure why, but I LOVE foil and foiling.  I don't actually foil all that often but I love how it looks.  My husband bought me the Minc Foil machine for Valentines Day and I'm excited to play with it. I will go through each Foil tool below: (This is going to be a long blog post) Fun Foils by  Queen and Co. Nail Foil by Amazon Heatwave Pen by We R Memory Keepers Foil Quill for a cutting machine such as (Silhouette Cameo, Cricut) by We R Memory Keepers Foil Quill Freestyle which is a handheld foil writer by We R Memory Keepers Minc Foil Machine by Heidi Swapp Queen and Co. Fun Foils This foil sticks to sticky surfaces.  If you are not familiar with Queen & Co. they make super cute shaker card stuff.  The foil they came out with will stick to their shakers or really any sticky surface like tape or glue. you simply press the foil to the sticky surface and it is foiled.  Super simple, super easy.  Sometimes you do not get a good...