Posts

Come and Sublimate with ME!

Image
  Convert an Epson ET-2720 into a Sublimation Printer! For my birthday this year my husband got me a printer that will use sublimation ink.  This has opened my eyes to a whole world of craftiness.  I did the research to find my best possible options and found a really good deal. What is Sublimation you ask? It is the process in which ink gets turned into a gas and infuses into the fabric or treated item causing the item to dye.  Its pretty awesome because there is no vinyl to deal with or weed.  You simply print an image and heat press it on with a heat press. Items you need to do this: Epson Eco Tank printer Most models will work, I bought the Et-2720 Sublimation ink, I bought the hiipoo brand found on amazon at this  link Sublimation Paper, I bought the paper on amazon at this  link Something to sublimate on. Must be 60% or more polyester or special treated items for sublimation purpose.  There are a ton of them on Amazon. A heat press or easy press but it must get to around 400 degr

Come and Make Shaker Cards with Me and Queen & Company!

Image
 I LOVE Queen & Company shaker cards.  One of my best friends started showing me their products years ago and I fell in love with the ease of making them. They have so many kits available to purchase.  To find them visit  Queen & Co (queenandcompany.com) Come Craft Queen & Co. with Me! I recently purchased their hot air balloon shaker card kit and their suitcase shaker card kit. The hot air balloon kit includes enough product to make 4 cards minus the shaker toppings or shaker bits.  Once you are done with their precut shaker components, you can purchase more or make your own with the dies included in the kit. You get: 4 envelopes 4 cards shaped as hot air balloons 4 acetate covers 4 shaped foams 3 dies (The hot air balloon, outline die, and basket die) I love that you can use any color paper and it comes out beautiful. All the sentiments were done with different die sets that I own. As you can see below I used some floral papers, bakers twine, sequins for my toppings,  ink

Adhesive Castor wheels for my ink tower? What?!?

Image
  As I was browsing youtube I noticed that people were buying castor wheels and similar rolling things to put on the bottom of their trash cans so that it rolls around.  I thought hmmmm I could put these on the bottom of my ink tower instead of using a lazy susan. I found these on Amazon here . For a box of 8 pcs I paid 6.49.  They come with a circle tape pad to adhere them to your item.   They work very well, they allow my ink tower to slide and turn on top of my desk and that  is exactly what I was looking for.  I love it! There are so many things I can think of to use these wheel castors on in my craft room, I am so excited! If you have used them for something, leave me a comment and let me know!   www.imginbugcrafter.com www.instagram.com/imginbugcrafter 💓Imginbugcrafter

Come and make earrings with me out of printable shrinky dink plastic!

Image
  Come and make earrings with me! I am so excited, I figured out how to make earrings of anything I want.  I am especially excited to make earrings out of pics of my vintage VWs.  This opens the door to make earrings out of my pets, my husband, any picture I would like! Items you will need: Ink Jet Shrink Film found on Amazon  here Earring studs with backs found here Clear embossing powder Versamark ink pad Heat gun Ink Jet printer Scissors or a cutting machine to cut them out I used my cameo to design, print, and cut out the images below. You can print from a printer and cut them out with scissors as well.  You can print on either side of the paper.  If you want a matching necklace or dangling earrings, don't forget to add a hole. I used a flat cookie sheet and placed the shrinky dinks on some wax paper.  I preheated the over to 250 and put them in until they were shrunk and flat. They will curl during the process just let them keep shrinking and they will flatten out. Once out of

Create a ink tower from Dollar Tree supplies with me!

Image
 Come and Create an ink tower with me! This is not my idea, in fact, the youtube I got the idea from is located at the following path.  I did modify the design a bit so I will post instructions below: Supplies 12 Crafter's square rectangular wooden crates from the Dollar Tree Click here for the link to order online. Bulk Crafter's Square Rectangular Wooden Crate with Handles | Dollar Tree 48 wooden clothese pins from the Dollar Tree Snippers, sharp scissors, or a box cutter Gorilla glue (white) or some kind of wood glue Spray paint Velcro to adhere ink blending pads Ink blending pads If you want to make a Lazy Susan, 2 cake pans and some marbles to fill the bottom of a cake pan First, you will want to prep your items. Separate your clothes pins.  Throw away the metal centers. Next, measure your clothespin by placing it inside one of the crates.  It will need to be the size of the crate.  This piece will later be glued inside to make a holder for each ink. Mark with a marker the

Come Make a Stamp Chuckie With Me!

Image
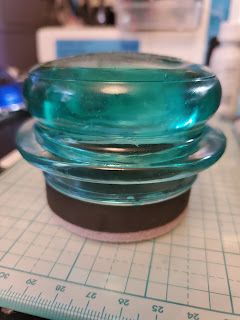
Have you used a Stamp Chuckie with your MISTI or Stamp Platform? You may be asking...."What is a stamp chuckie?"  I am sure a few of my friends are reading this blog right now about to text me and ask me if I've gone crazy and if I've started to imagine new products for stamping. Nope, I have not and yes this is really a thing.   Now, a stamp chuckie is used with a MISTI or stamp platform and instead of using your hand to rub the door of the stamp platform you use the handheld apparatus to smoosh the door down.  It gives you more pressure than your palm.   I'll show you! This is my handmade chuckie or helper for my stamp platform. Supply List to make your own  Candle or Jar lid Gorilla Glue or E6000 CTMH ink refill ModPodge Circle Furniture moving pad it is made of a yankee candle lid, I took the plastic pc off the lid, colored the lid by painting it with ModPodge and I mixed a few drops of a Close to My Heart ink refill in it to make it look like sea glass.  I th

Come Prime Your Stamps With Me!

Image
 Prime your stamps with me! Do you ever get a brand new set of clear stamps and they do not stamp well? its not you, or your stamps, or your ink.  During the manufacturing process of clear stamps a thin layer of something is applied to the surface of the stamp.  Sometimes that causes a stamp to stamp a blotchy image the first few times you use it. I am going to show you a few ways to prime your stamps so that you do not have this issue. It is best to get into the habit of priming your stamps the first time you use them.   There are a few ways to prime your stamp.  Try them all and see which way you like? Lets prime those stamps! 1. Versamark I saw this tip from Jennifer McGuire and it really is a cool trick.  Check her out on YouTube as she is a wealth of knowledge. You can stamp once with a Versamark ink pad and your stamp should stamp clearer. Simply stamp on a scratch piece of paper, wipe off the excess versamark with your hand and it should be primed.   The left side was primed wit

Come Craft Distress Oxides With Me!

Image
Come Craft Distress Oxides With Me!  For Mother's day my husband always asks what I want.  It is almost always a crafty item that I've been wanting but something I wouldn't just go out and buy.  When my kid moves out and becomes her own person I probably won't buy things for myself anymore LOL its just something we do.  I do the same for Father's day and he gets something he wants.  Its really just an excuse to buy things.  His is never "crafty" LOL This year I chose Distress Inks because I love them but buying a ton of them would be expensive.  I bought mine at Joann mostly because they had a door buster for 50% off.  I also bought some colors on Amazon, at Michaels, and you can also find some of them at my Close To My Heart website for purchase. Home | Close To My Heart You can check out my organizing distress oxides for an idea on how I personally organize mine but this blog is going to be about using them.   Its so easy!  They blend so nicely you canno